
— — — — —
— — — — —
— — — — —
— — — — —
— — — — —
— — — — —
— — — — —
— — — — —
The purpose of this guide is to walk you through the process of creating a simple game from scratch using your own custom-made resources. While some detail will be provided for each step, it is recommended that you have a basic understanding of the editors. If you are unsure of the controls or how to complete a certain action, refer to the individual editor guides that are available from the sidebar. As new features are added to the software, I intend to update this guide accordingly to cover those new features. If there is any particular functionality that you think would be useful to include, please let me know!
If at any point you get stuck or would just like to grab the resources created for this guide, the game project can be downloaded in its entirety here: example_desert_game.zip
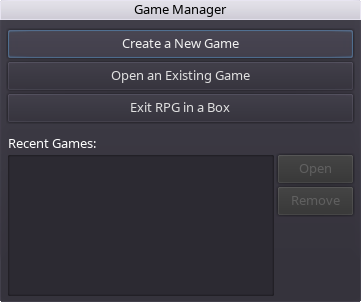
When RPG in a Box is first launched, the Game Manager dialog is displayed. The Game Manager allows you to either open an existing game project or create a new one. In this guide we are creating a new game project, so click on the “Create a New Game” button at the top.
Once you indicate that you want to create a new game, the “Create a New Game” dialog will display. This dialog is where you will specify some initial settings for your project. Click the “Browse” button and navigate to a location where you'd like to store your project's files. It is recommended to create a new empty folder for your project. Here you will also specify a name for your game and whether you want to import the example content. Ensure that the “Import example content checkbox” is not checked since you'll be creating your own content for this project. Click OK to proceed once everything is set.

This section will guide you through the creation of some resources for your game. We will create a few tiles and objects, a small map, and a character to represent the player. For this guide, let's use a desert theme for the content.
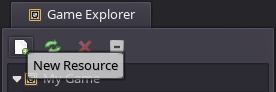
After you have finished creating your game project, click the “New Resource” button ( ) located on the Game Explorer toolbar.
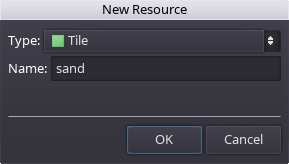
For our first tile, let's create some sand. Ensure that “Tile” is the selected type, then enter “sand” for the name and click OK.
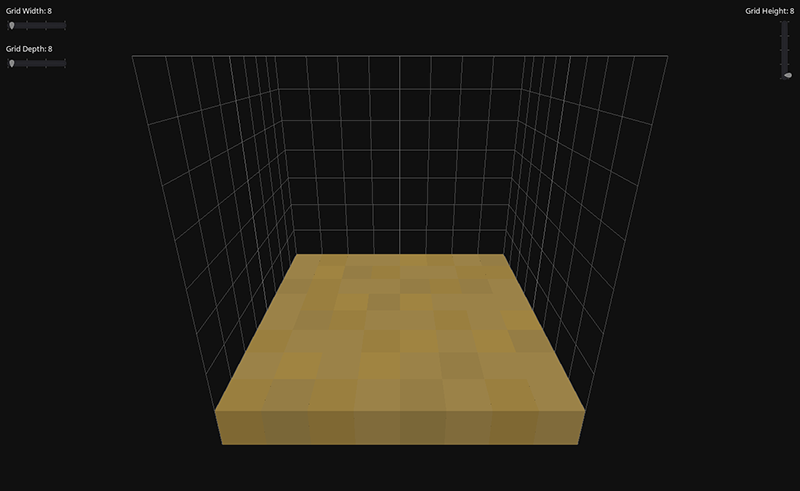
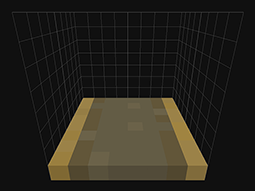
The Voxel Editor will open and you can begin editing your tile. The default tile size is 16x16x24, but for the sake of simplicity let's make it smaller. Click and drag the “Grid Width” slider down to 8. You will notice that the “Grid Width” and “Grid Depth” sliders are locked together. This is the case for tiles since they must always be square. Also adjust the “Grid Height” slider to 8. Now using various shades of light brown, place some voxels to create a 16x16x1 tile. For a flat tile, the top view will probably work best. For more details on the usage of the Voxel Editor, check out the Voxel Editor page.
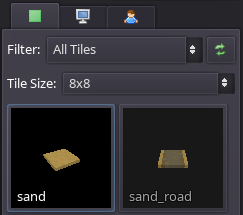
Once you are happy with the look of the sand tile, click the “Save” button ( ) on the Voxel Editor toolbar. Your new tile will now appear in the resource panel at the right side of the application as shown below.

Now let's create another tile with a roughly paved road down the center. If you are creating a model similar to an existing one, the easiest way to do this is by clicking the “Save” As button ( ) on the Voxel Editor toolbar. This will make a copy of the current model with a new name. When the “Save As Resource” dialog appears, enter “sand_road” for the name and click OK.


On your newly created tile, draw a road down the center using some darker grey/brown colors and save it. I also made another copy of my original sand tile using the “Save As” button again and named it “sand_rock”. As shown below, I simply made one of the voxels grey to give the appearance of a rock. This will add some variety to the terrain.

Now that we've created a few tiles for our desert, let's create some objects. Click the “New Resource” button () on the Game Explorer toolbar, but this time choose “Object” as the type. Enter “cactus” as the name and click OK.
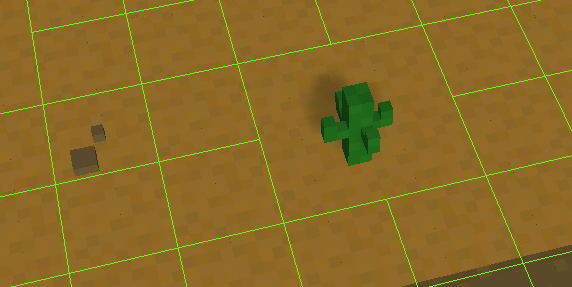
Adjust the size of the grid to be 8x8x10 using the “Grid Width”, “Grid Depth”, and “Grid Height” sliders. You will notice, unlike tiles, that the width and depth can be adjusted separately for objects. Change the voxel color to a green of your choice and build a cactus in the editor similar to the one shown below. This will make our desert a bit more interesting.
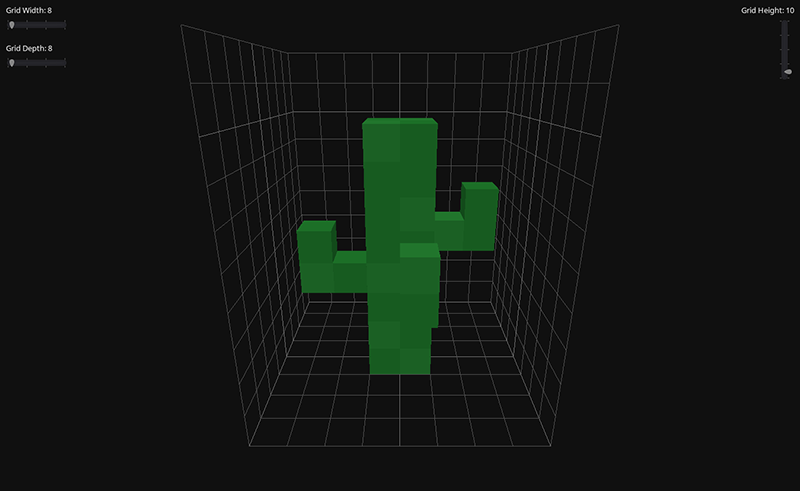
You may have noticed before that there is a “Passable” property listed in the Model Properties panel when the Voxel Editor is active. For tiles, this property is named “Walkable” and defaults to “On”. The “Passable” property should default to “Off” for objects, but ensure that the checkbox is not checked since we don't want the player to be able to walk through the cactus. Save your cactus object before continuing.

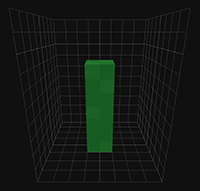
Using the “Save As” button () as before, create one or two more copies of the cactus and modify them slightly so you'll have a few variations to select from. As shown below, I “trimmed” my original cactus to create some new ones with fewer branches. As you can see, I also created a “rock” “object”. Since it's only a small rock, I ensured that its “Passable” property in the Model Properties panel was enabled since it should not impede the player's movement.


You should have a nice selection of tiles and objects to build with now, so we can move on to the map creation!
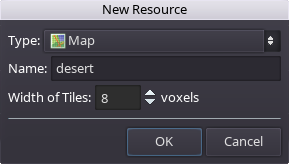
Click the “New Resource” button () on the Game Explorer toolbar and enter “desert” for the name. You will also want to set the “Width of Tiles” to be 8 voxels so the tiles we created earlier will correctly match up with the grid. Click OK once the name and width have been set.
Once the Map Editor has opened with your new map, click on the sand tile in the resource panel.
Place some sand tiles to form a small square as the initial base for the map. You can toggle the “Randomize Rotation” button ( ) on the Map Editor toolbar when placing tiles or objects to add variety to the placement, or right-click to rotate the pending resource to a specific angle before placing. Then, place some of the road tiles down the width of the map and scatter several of the “sand with rock” tiles around as desired. For more details on the usage of the Map Editor, check out the Map Editor page.
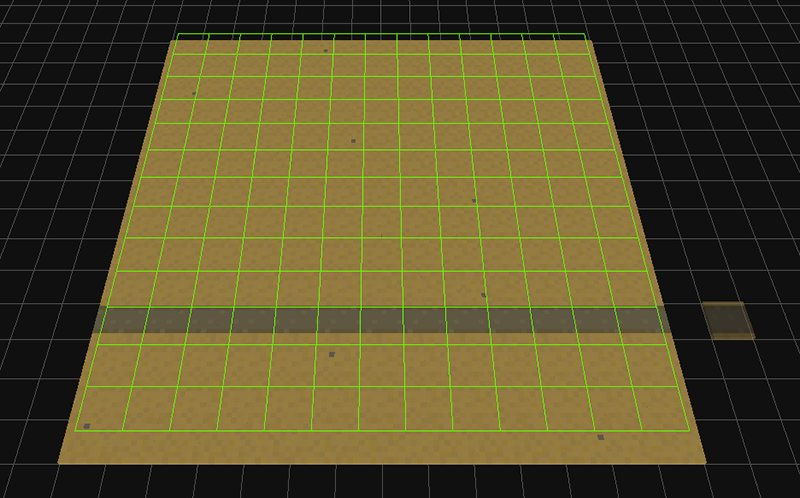
Next, open the “Objects” tab on the resource panel (second tab) and select a cactus. When placing a cactus onto a tile (and assuming that “Navigation Paths” are enabled on the toolbar) you will notice that the green navigation lines will update to indicate that the player can no longer walk through this tile since we defined the cactus as not being passable.
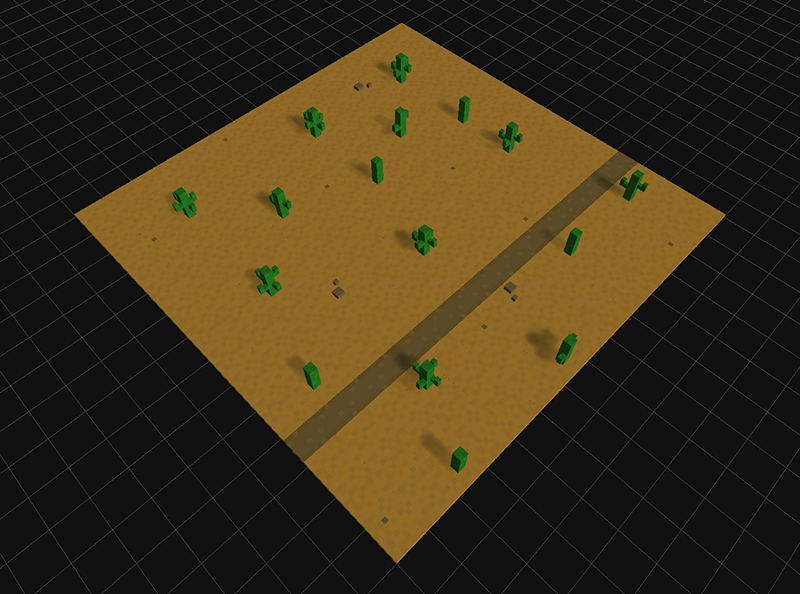
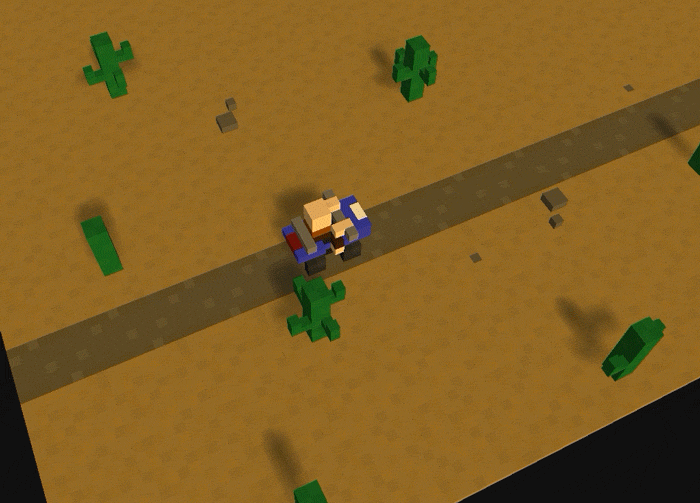
Add a bunch of cactuses and a few rocks around the sandy parts of the map, then use the “Save” button () on the Map Editor toolbar to save the map. To achieve the appearance of the desert below, I also went into the Map Properties panel and made a few lighting adjustments. I chose a dark grey for the ambient light color and a bright yellow for the directional light color. Shadows were also enabled under the directional light section. Don't be afraid to experiment! The lighting can make a lot of difference in the visual style of your map.
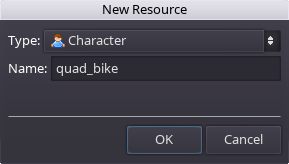
In addition to the map, you'll also need a character model to represent the player. Click the “New Resource” button () on the Game Explorer toolbar again and select “Character” as the type. For our player character, let's create a person riding a four-wheeler/quad bike to go along with the desert theme, so enter a descriptive name such as “quad_bike” then click OK.
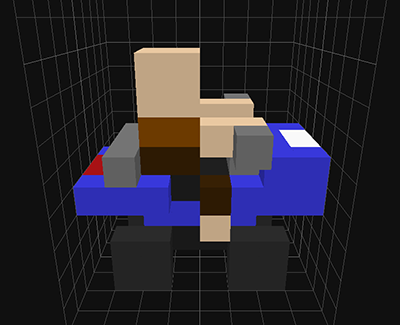
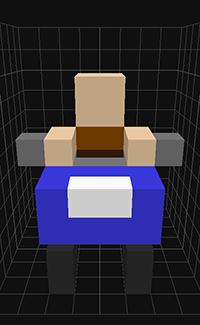
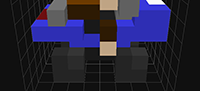
Adjust the grid dimensions to 8x8x10 and then create a model similar to the one shown below. The screenshots are taken from the left, front and back views, respectively.

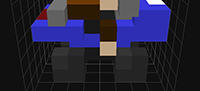
In order to give the appearance of motion when the player is driving around, let's create a simple animation for the model. Click the “Duplicate Current Frame” button ( ) on the animation toolbar (located below the 3D view of the Voxel Editor) four times to create four new frames identical to the original frame. As shown in the four images below, I changed one of the voxels in each tire to a lighter color in frames 2 through 5 so the tires will appear to spin. I also made the red brake light at the back of the bike a brighter red in frame 1 so the brake light will appear to come on when the player is stopped.


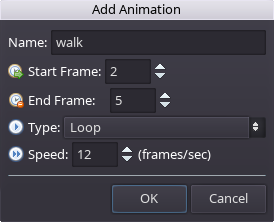
Now let's define a “walk” animation for the player character. Click the “Add Animation” button ( ) on the animation toolbar.

In the “Add Animation” dialog that is displayed, enter the values as shown below and click OK. It is important that the animation is named “walk” exactly (in all lowercase). When playing, the game will look for an animation with this name and trigger it whenever the character is moving. The project files linked at the top of this tutorial also includes an “idle” animation for the bike and a slightly improved “walk” animation. The “idle” animation is another type of predefined animation which automatically plays whenever the character is not moving.
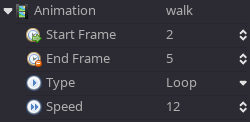
Whenever an animation is added to a voxel model, the animation will appear in the Model Properties panel at the left. From there, you can modify the “Start Frame”, “End Frame”, “Type”, and “Speed” of the animation after it has been defined.
Go ahead and save the quad bike once you are finished.
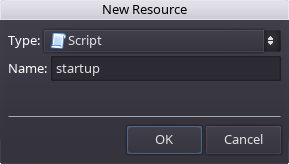
We need to create one more resource before we can configure and export the game: a startup script. The startup script is important because it tells the game what to do when the player first launches your game. Click the “New Resource” button () on the Game Explorer toolbar and select “Script” as the resource type. Enter “startup” for the name (this can be whatever you want, but it's good to use something descriptive), then click OK.
The Script Editor will open your new script, which initially will only contain a “Start” node. In this guide, we will simply add a Load Map node to the script. This function will, as its name implies, load a map. This is all we will need to get the game started. To do this, double-click on Load Map in the list to add a node for that function into your script. It will then appear in the visual script graph. Ensure that the “desert” map is selected in the “Map Name” dropdown. With this function, you can also specify the starting tile coordinate that the player will start on as well as the direction the player will be initially facing. You can leave these values as is (unless you happened to have placed a cactus on coordinate (0,0,0), in which case you'll want to specify a different tile coordinate).
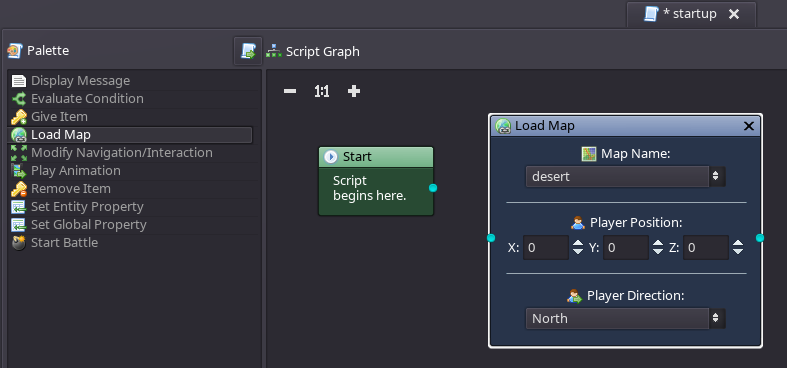
Now you'll need to connect the Load Map node to the “Start” node in order for the function to be executed when the script is triggered. Click and hold on the cyan-colored output connector on the right side of the “Start” node, then drag the mouse down to the similar input connect on the left side of the Load Map node. You should now see a cyan line connecting the two nodes together. Go ahead and save the script.

Below the visual script graph, you will notice there is an area titled “Source Code”. This is primarily for informational purposes, but can be helpful if you are interesting in learning the custom scripting language that is used by RPG in a Box. The source code is updated in real-time as you edit the visual script graph. For more details on the usage of the Script Editor, check out the Script Editor page.

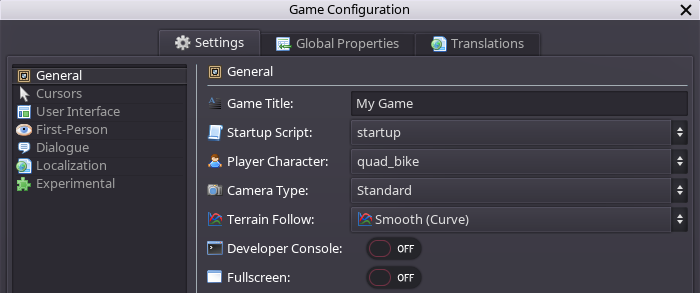
We've created all of the necessary resources (tiles, objects, map, player character, and startup script), so now we are ready to configure a few settings for the game. In the Game Explorer, double-click the Game Configuration item that is listed directly underneath your game's title.

Once the Game Configuration dialog appears, select “startup” for the “Startup Script” setting and “quad_bike” for the “Player Character” setting. As mentioned before, when the game first launches it will trigger the startup script defined here. The player character that is defined here will be used for the default player model (unless a “Player Override” is set for the map from the Map Properties panel). Click the “Close” button to save the settings.
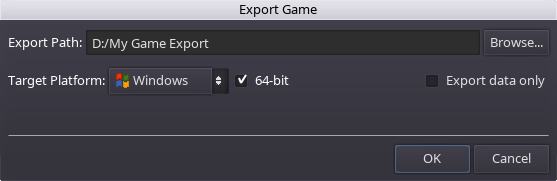
Now that we've configured the game settings, let's export the game to try it out. On the main toolbar at the top of the application, click on the “Export Game” button ( ). Once the “Export Game” dialog opens, click the “Browse” button and create a new folder to use as the destination. Once the export destination path is set, select the appropriate target platform from the dropdown. In this case, you would want to select the platform you are currently running on. If you have previously exported your game to this location for same platform, you can check the “Export data only” checkbox to have the application only copy your resource package and skip the executable file. Once ready, click the OK button to proceed with the export.
Now that your game has been exported, use your system's file explorer to navigate to the destination folder that you selected in the “Export Game” dialog and double-click the “game_launcher” executable file to launch the game.
That wraps up this guide! You have successfully created and exported a game with custom content using RPG in a Box.