Difference between revisions of "Map Editor"
| Line 11: | Line 11: | ||
* [[File:Grid.png]] '''Toggle Grid:''' Enables/disables the tile grid lines. | * [[File:Grid.png]] '''Toggle Grid:''' Enables/disables the tile grid lines. | ||
* [[File:Navigation.png]] '''Toggle Navigation Paths:''' Enables/disables the navigation paths. These will appear as green lines between tiles and indicate the paths that the player can walk along. | * [[File:Navigation.png]] '''Toggle Navigation Paths:''' Enables/disables the navigation paths. These will appear as green lines between tiles and indicate the paths that the player can walk along. | ||
| + | * [[File:Flag_blue.png]] '''Toggle Markers:''' Enables/disables markers. These markers are labels in the 3D view and can be used to quickly identify which objects have scripts, which characters have dialogue, locations of lights, etc. | ||
* [[File:Bricks.png]] '''Place Mode:''' Switches to placement mode for placing tiles and objects. | * [[File:Bricks.png]] '''Place Mode:''' Switches to placement mode for placing tiles and objects. | ||
* [[File:Brick_edit.png]] '''Edit Mode:''' Switches to editing mode for selecting/rotating/deleting/etc. tiles and objects. | * [[File:Brick_edit.png]] '''Edit Mode:''' Switches to editing mode for selecting/rotating/deleting/etc. tiles and objects. | ||
| − | |||
| − | |||
| − | |||
== 3D View == | == 3D View == | ||
The main 3D view is used to visually edit the map. See the '''Controls/Shortcut Keys''' section further down for details on working in the 3D view. In the bottom-right corner of the 3D view, the current (X, Y, Z) coordinate will be displayed according to the mode you are in. In Place Mode, this shows where the resource will be placed. In Edit Mode, this shows the coordinate of the resource that is selected. | The main 3D view is used to visually edit the map. See the '''Controls/Shortcut Keys''' section further down for details on working in the 3D view. In the bottom-right corner of the 3D view, the current (X, Y, Z) coordinate will be displayed according to the mode you are in. In Place Mode, this shows where the resource will be placed. In Edit Mode, this shows the coordinate of the resource that is selected. | ||
Revision as of 18:16, 14 February 2016
Contents
Overview
The Map Editor is where everything comes together. You will use this editor to create the maps for your game using the available tiles, objects, scripts, etc.
Components
Toolbar
-
 New: Opens the New Resource dialog with Map selected as the resource type.
 -
 Save: Saves the map. This will become enabled any time changes have been made to the map.
 -
 Save As: Saves the map to a new file with a different name. A dialog will open to prompt for the new name. Once saved, the map will be opened in a new tab.
 -
 Clear: Removes all tiles and objects from the map.
 -
 Toggle Grid: Enables/disables the tile grid lines.
 -
 Toggle Navigation Paths: Enables/disables the navigation paths. These will appear as green lines between tiles and indicate the paths that the player can walk along.
 -
 Toggle Markers: Enables/disables markers. These markers are labels in the 3D view and can be used to quickly identify which objects have scripts, which characters have dialogue, locations of lights, etc.
 -
 Place Mode: Switches to placement mode for placing tiles and objects.
 -
 Edit Mode: Switches to editing mode for selecting/rotating/deleting/etc. tiles and objects.
3D View
The main 3D view is used to visually edit the map. See the Controls/Shortcut Keys section further down for details on working in the 3D view. In the bottom-right corner of the 3D view, the current (X, Y, Z) coordinate will be displayed according to the mode you are in. In Place Mode, this shows where the resource will be placed. In Edit Mode, this shows the coordinate of the resource that is selected.
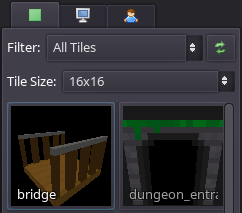
Resource Selection Sidebar
On the right-hand side of the application, there is a sidebar containing two tabs: Tiles and Objects. These display lists of the resources available to place into your map. Each resource is shown as a 3D preview that rotates if selected. If desired, you can double-click on a resource to open it in the Voxel Editor, or single-click to select it and then click on the small button that appears in the top-right corner.
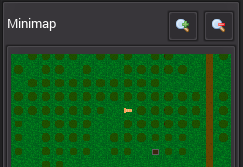
Minimap
Below the resource selection sidebar, there is a small window containing a minimap. This is simply an overhead view of the current map.
Controls/Shortcut Keys
Camera
- Middle Mouse Button + Drag: Rotate camera
- Shift + Middle Mouse Button + Drag: Move camera
- Scroll Wheel Up: Zoom camera in
- Scroll Wheel Down: Zoom camera out
Place Mode
- Left Mouse Button: Place tile/object
- Right Mouse Button: Rotate pending tile/object
- A: Raise placement grid by one unit
- Z: Lower placement grid by one unit
- X: Reset placement grid to zero
Edit Mode
- Left Mouse Button: Select tile/object
- Control + Left Mouse Button: Select multiple tiles/objects
- Right Mouse Button: Context menu
-
 Rotate Clockwise (R): Rotated the selected tiles/objects clockwise
 -
 Rotate Counterclockwise (T): Rotated the selected tiles/objects counterclockwise
 -
 Delete (D): Delete the selected tiles/objects
 -
 Add to Group... (G): Add the current selection to a group
 -
 Edit Script... (S): Edit the script for the selected tile/object
 -

 Set Path as Walkable/Unwalkable (W): Toggle the walkability of tiles (two adjacent tiles must be selected)
 -
 Copy (X,Y,Z) Coordinate (C): Copy the (X,Y,Z) coordinate of the selected tile/object to the clipboard
-


